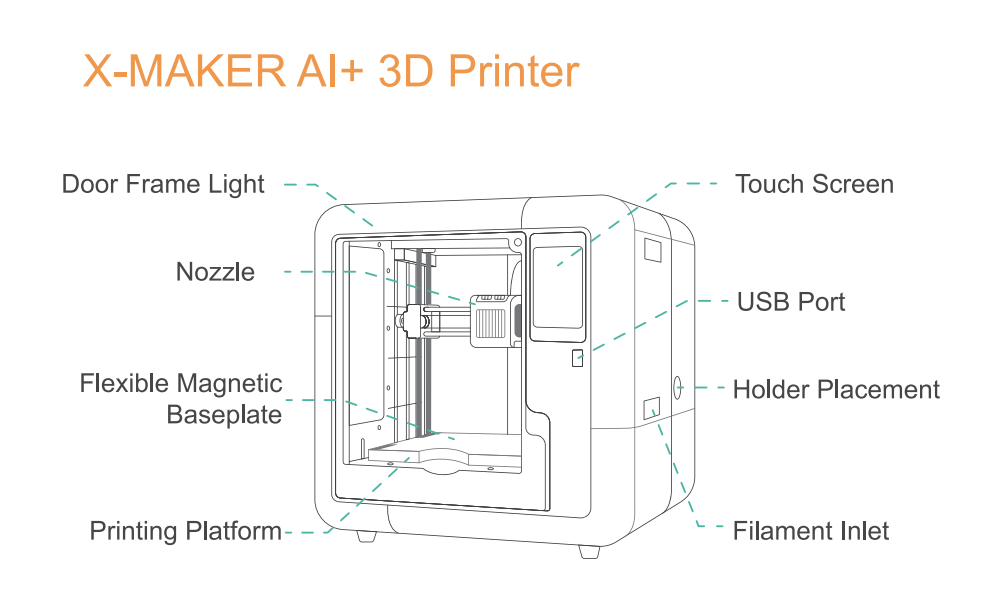
¶ Knowing Your X-MAKER AI+
¶ Quick Start Guide
This section will take you through the steps required to set up your new machine and get started with your first print. Check out the X-MAKER AI+ Quick Start Guide.
¶ 1. Unboxing and Installation
Due to constant version iterations, the actual accessories (such as protective foam, the through pin, tools, etc.) in the box might be slightly different from those shown in the unboxing video or the pictures in the article. Please refer to the actual package received.
Follow the steps below to properly unpack and install your new X-MAKER AI+ 3D printer.
¶ 2. Network Connection (2.4GHz Wi-Fi)
To manage the printer and printing, you'll need to connect the printer. Follow the steps in the articles below to connect.
Network connection (2.4GHz Wi-Fi)
¶ 3. Loading Filament
After setup, load the filament. Below is a detailed instruction on how to load the filament.
¶ 4. Starting a Print
You are now ready to start your first print. There’s no need to upload a model manually, use a 3D slicer, level the bed, or set the temperature. Simply tap the screen, and you’ll soon have your 3D print!
Starting a print using a USB drive and using the XMAKER app
¶ Features
This section contains the most commonly features of the X-MAKER AI+. Click on the articles to find them out!
¶ Connecting the Printer
The X-MAKER printer can connect to your phone, tablet, and computer via Wi-Fi. Using the corresponding XMAKER app, you can easily print, control, and perform other related operations. This wireless connection and remote control capability is a key feature of modern 3D printers, greatly enhancing user convenience and flexibility. Below, we’ll demonstrate how to connect the printer using the mobile app.
¶ Printing THINGS
After the test print, you can print whichever models you like. For example, you can view various models and print them out in XMAKER app under THINGS. By following these steps, you can turn 3D models into tangible objects.
¶ Filament Replacement
This is a detailed step-by-step guide for replacing filaments on your printer.
¶ Filament Detection
Filament Detection is a function that activates when the filament runs out and isn’t changed. When triggered, the printing will stop. Follow the steps below to handle the operation after this function is activated:
¶ Bed Calibration and Leveling
X-MAKER AI+ printers are rigorously tested for printing before they leave the factory and can print right out of the packaging without the need for calibration and leveling. If the printhead becomes inaccurate due to transportation or other reasons, resulting in warping and displacement of the model, you can refer to the following steps to calibrate and level the printer and print again.
¶ Quick Swap Nozzle
Below is a step-by-step guide on how to change the nozzle in the X-MAKER AI+ 3D printer.
¶ Power-Loss Recovery
Power-Loss Recovery is a function that allows the printer to save the current printing progress and seamlessly continue the print job after power is restored following a sudden power outage during the printing process. Follow the steps below to handle the operation after this function is activated:
¶ Printer Light
When the printer is on, both the internal and external lights are illuminated. To turn them off, follow these steps:
¶ Firmware Update
¶ Screen Firmware Update
The steps to update X-MAKER 3D printer screen firmware are as follows.
¶ Motherboard Firmware Update
The steps to update X-MAKER AI+ 3D printer motherboard firmware are as follows.
¶ Troubleshooting
This section covers troubleshooting issues and solutions for the best assistance.
¶ Changing Print Head
The steps to change the X-MAKER AI+ print head are as follows.
¶ Nozzle Clogged
The steps to clog the nozzle are as follows.
¶ Tube Clogged
The steps to clog the tube are as follows.
¶ Poor Print Quality
This article is about how to resolve poor print quality.
¶ Changing Pneumatic Fitting
This is a guide on how to change the pneumatic fitting/connector.
If you have any further questions, please contact service@aoseed.com for assistance.